

Weight Scaling

ReStackor pro
Weight scaling suspension setups:
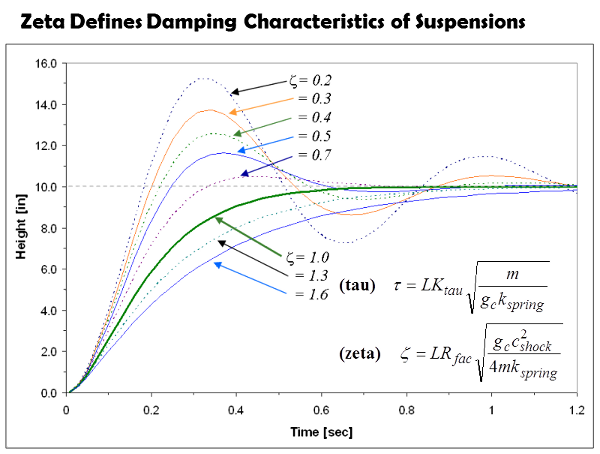
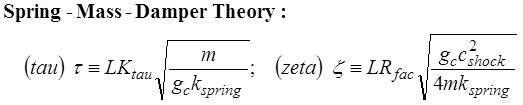
Spring-mass-damper theory defines two parameters tau and zeta which control suspension response, feel, behavior and performance.
-
Tau defines the oscillation frequency and is a function of mass and spring rate.
-
Zeta defines the damping characteristics and is a function of mass, spring rate and damping.
Changing spring rates in a stock suspension shifts the value of zeta and forces the suspension into an under-damped or over-damped condition. Correcting damping rates to restore the original value of zeta restores the suspension response, feel and performance the factory intended for your bike.
Spring-Mass-Damper theory defines two parameters tau and zeta that control the ride, feel and response of a suspension.
Scaling Stock Suspensions
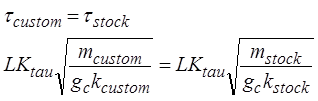
Getting the suspension natural frequency right (tau) is pretty straight forward. Tau is defined as the ratio of mass to spring rate (m/k). That ratio makes tau basically equivalent to race sag. Changing suspension spring rates to match the target value of race sag basically setups up the suspension to match the factory value of tau. When race sag is matched the suspensions are in the same stroke position so the link ratio LK.tau value is the same for both setups.
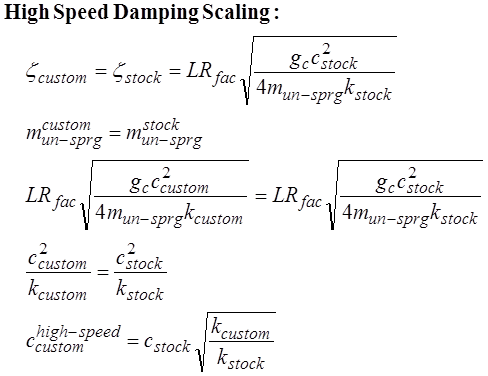
High Speed Damping
At high speed the suspension needs to damp the un-sprung mass of the wheel. Since the wheel weight is the same in both setups the correction in damping only has to account for the change in spring rate. Working through the algebra gives:
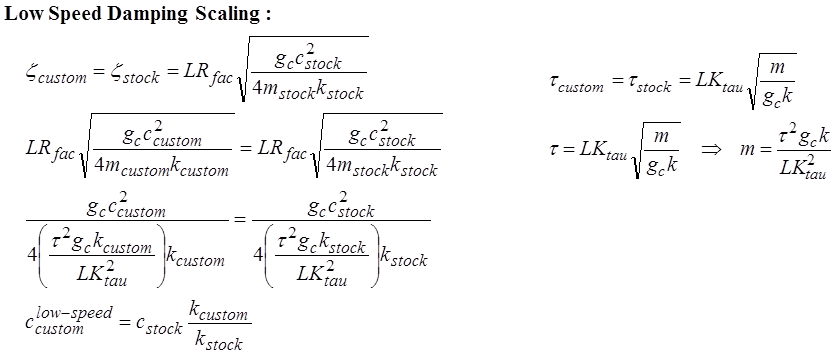
Low Speed Damping
At low speed the shock needs to damp oscillations of the chassis. Getting zeta right at low speed requires adjusting damping to correct for the change in both spring rate and rider weight. Tau defines the relationship of mass to spring rate and that term can be manipulated to replace mass in the zeta equation and rewrite zeta in terms of spring rate only. The link ratio terms in the equation drop out since they are the same in both setups.
Correcting low speed damping requires a larger modification to correct for the change in both rider weight and spring rate. Herein lies a controversy:
-
If you want a sit-down setup low speed damping needs to be corrected for both spring rate and rider weight
-
However when the terrain gets rough most riders stand up
-
-
For a stand-up setup (the more typical case) low speed damping only needs to corrected for spring rate since the chassis weight is the same.
ReStackor accommodates both cases. For the recommended stand-up setup low speed damping only needs to be corrected for the spring rate change which means the correction is the same as the high speed case. For the sit-down setup low speed damping needs to be increased to the value shown by the low speed curve.
![]()
ReStackor pro Suspension Weight Scaling
The above relationships specify the damping force change needed to correct for a change in spring rate. The first step in weight scaling is to figure out the damping force of the stock suspension system. Then, hack around on the shock shim stack configuration to figure out the shim stack modifications needed to produce the required damping force change.
This problem is custom made for ReStackor using the weight scaling spreadsheet shown below.
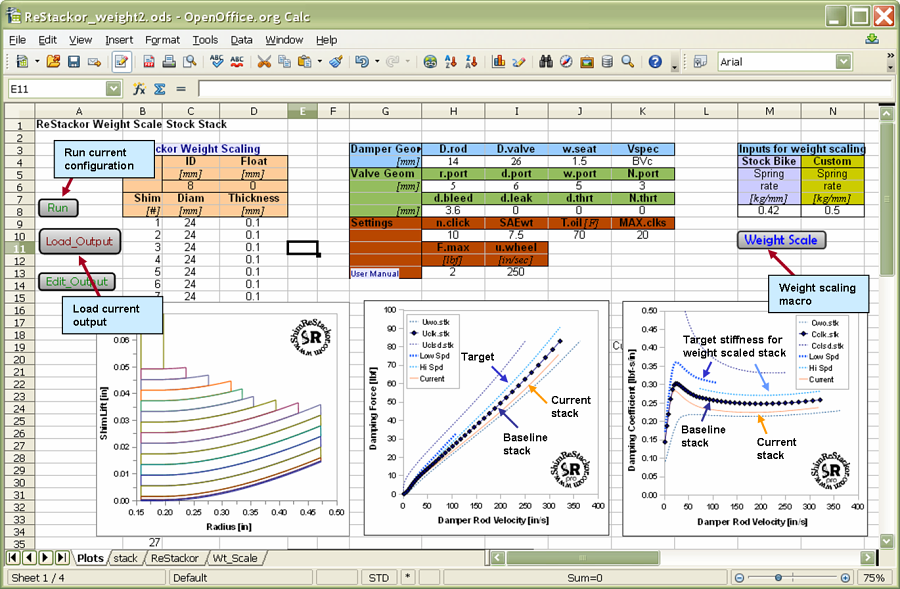
The ReStackor pro weight_scale.xls spreadsheet is setup to make weight scaling easy.
Weight scaling a suspension requires these steps:
-
Enter the stock shim stack configuration in columns C and D and the details of the suspension valve geometry in cells H4 through K10. Click the "Run" and "Load_Output" buttons to compute the stock configuration damping force.
-
Enter the spring rate for the stock setup in cell M8 and the spring rate you want in cell N8. Click on the "Weight_Scale" button to compute the damping force needed for the new spring rate and the "Load_Output" button to load the calculation results into the Wt_Scale tab of the spreadsheet.
-
All of the plots in the spreadsheet are updated when you hit the "Load_Output" button.
-
The damping force curve shows the damping force produced by the stock suspension setup (Uclk.stk) at the clicker settings specified in cell H10. The Uwo.stk and Uclsd.stk curves show the stock damping force with the clickers wide opened and closed.
-
The dashed blue curve (F.trg) is the damping force needed for the new spring rate. The dashed curve is the weight scaled target curve.
-
The final step is hack around on the shim stack configuration to figure out the number of shims to add or subtract from the shim stack to get the shock damping force to line up with the target damping force curve. That process is modify the shim stack configuration in columns C and D, click the "Run" and "Load_Output" buttons, and inspect the plots to see how close the configuration is to the target curve.
It is that easy. The frames below step through the process.
![]()
One Face Shim Added To Baseline Stack
With one face shim added to the baseline stack the damping is slightly stiffer (orange curve) but short of the target damping force. Matching the target damping force is going to require more shims to be added to the stack.
Modifying shim stacks in ReStackor is as simple as adding shims to the stack and clicking on the "Run" and "Load_Output" buttons to see how close the shape and magnitude of the new damping force curve is to the target damping force curve.
![]()
Baseline Stack With Two Face Shims Added
With two face shims added the damping curve is close to the target stack stiffness at high speed. The low speed damping is too low. Getting more low speed damping is going to require modifications to the stack taper.
Adding two shims to baseline stack produces a damping force curve close to the target stack at high speed but the low speed damping is too low.
![]()
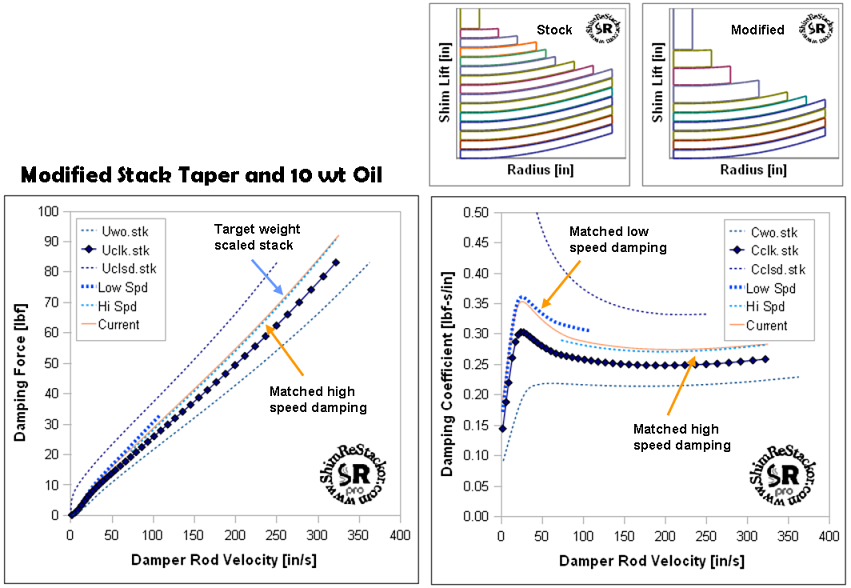
Oil Viscosity Effects On Damping Performance
Increasing the thickness of the clamp shim and the first to shims in the stack taper made the low speed damping stiffer but that increased the high speed too much. Getting the high speed right required removing some face shims to compensate for the stiffer stack taper and that ended up making a bunch of mods to the stack as shown.
In the end, getting the low speed damping right required changes to the stack taper and increasing the oil viscosity from 7.5 wt to 10 wt. With those mods the new shim stack (orange curve) is close to the target weight scaled damping force curve shown by the dashed lines.
A stiffer stack taper and oil viscosity increase from 5wt to 7.5wt is needed to match the weight scaled target stack stiffness.
The typical tuning approach is just add face shims until the suspension stops bottoming. Weight scaling allows you to go a step beyond that and preserve the low speed, high speed and damping profile the manufacture intended for your bike. While that setup may not be optimum, it usually provides a really good starting point to begin the tuning process.
![]()
Weight Scaling Damping Rates of the Stock Suspension for a Rider of Different Weight
Spring-mass-damper theory defines two parameters that control suspension response.
-
Tau defines the oscillation time constant of the suspension and will be the same for two riders of different weight if the spring rates are setup to produce the same race sag.
-
Zeta defines the damping characteristics of the suspension and is a function of mass, spring rate and damping.
-
LK.tau and LR.fac define the suspension link ratio and the actual forces delivered from the shock to the wheel.
-
Changing the rider weight and spring rate in a stock suspension drives the value of zeta into an under-damped or over-damped condition.
Manufactures spend millions setting up suspensions on their production bikes for the simple purpose of winning MX shootouts in the magazines. Weight scaling provides a simple method to preserve that performance and correct damping for a change in spring rate.
ReStackor gives you the capability to figure out the tau and zeta values the suspension was designed around and scale those values to correct for changes in rider weight and spring rate. Setting up your suspension to preserve the factory tuning gives you the ride performance, feel and behavior the manufacture intended for your bike.
Simple inputs - Thorough analysis - Practical results.
ReStackor takes the guess work out of suspension tuning
